Articles,
DIY Advice
How To Lay Wall Tiles
01.07.20
Suggested Tools Checklist:
- Tiles
- Adhesive
- Grout
- Snapping pliers
- Tile cutter
- Tile saw
- Sponge
- Silicone sealant
- Tile nippers
- Tile rasp
- Gauging batten
- PVC trim for
- external corners
- Adhesive spreader
- Grout spreader
- Sponge
- Tape measure
- Tile spacers
- Straight edge
- Tile scorer
- Plumb line
- Battens for setting out
- Plastic bucket
- Masonry nails
PREPARATION AND PLANNING
Plan your tiling carefully and buy all the tiles you need at the same time ensuring they are suitable for the area you intend to tile - if you need help refer to design and planning section for the relevant project area. As tile shades can vary from batch to batch it's important to order the quantity you need at the one time after allowing an extra 10% for breakages and cutting.
The surface you plan to tile needs to be clean, dry and flat. If you have recently plastered the wall you will have to wait about four weeks to allow the plaster to fully dry out. Cracks and holes need to be filled with a suitable filler. Porous surfaces need to be primed so the moisture from the tile adhesive is not absorbed by the plaster. Walls should be flat and free from bows.
Old wallpaper, loose paint and plaster must be removed. Painted surfaces, if sanded, can be tiled over. Gloss paint should be scoured with course sandpaper to assist adhesion. extured paint should be removed completely.
Prepare a gauging batten with the size of the tile plus 3mm of grout marked along its length. Consider centering lines around windows and wash basins.
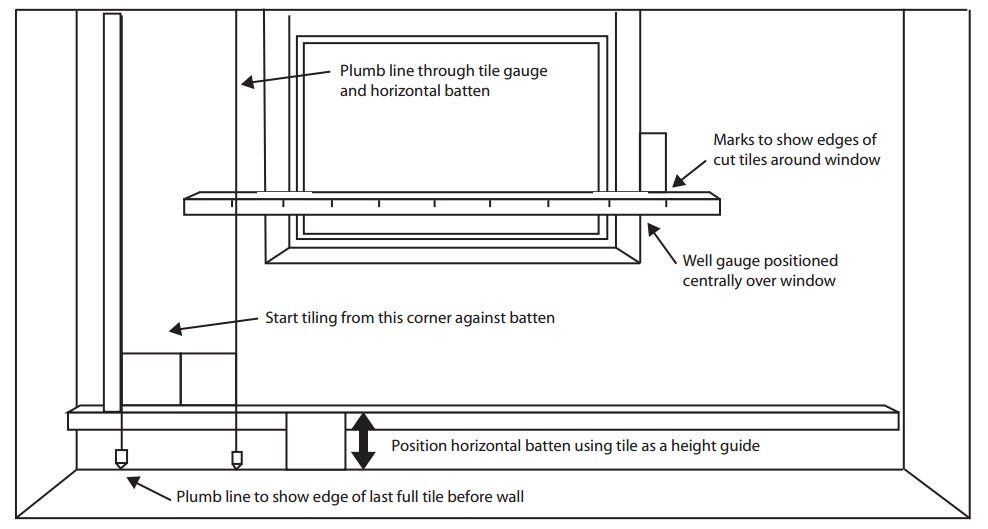
SETTING OUT
Arrange the tiles so that the cut tiles fill the spaces at the ends of the rows. Try to avoid using cut tiles in the middle of walls as it looks unsightly. Cut tiles should be fitted at the back of recesses and into corners where they are not readily noticed. Try to ensure that the set out allows cut tiles to be as wide as possible. Window reveal tiles are fixed after the wall tiles have set.
TILING A PLAIN WALL
Secure your starting battens in place making sure that they are straight and square with a spirit level. Spread the tile adhesive using a notched spreader, evenly. Do not cover more than you can tile in 20 minutes (approx. 1 square metre at a time). Place your tiles using a 'sliding action' into place. The sliding action ensures an even coverage of adhesive behind the tile. Remember to place tile spacers between each tile to allow accurate and even spacing. It's a good idea to regularly check that the tiles are straight using your spirit level, as you go along.
Wipe away any tile adhesive that squeezes out, with a sponge, ensuring there will be sufficient room between the tiles to apply the grout. For a more professional finish to corners or as a smooth capping to a row of tiles, use PVC trim for edging.
CUTTING WALL TILES
You will need to cut and shape some tiles to fit them around pipes, bathroom fittings, window frames, etc. This can take a little practice, so have some spare tiles handy. For simple straight cuts, tiles can be scored with a tile cutter. Place the scored tile over two matchsticks, press down gently either side to snap. If you only need to trim the edge of the tile, score it and use a pair of nippers to 'nibble off' the excess. To cut more complicated shapes, you may find it easier to make a template and transfer this onto the tile and use a tile wet saw. If you need to cut a large hole, cut the tile in half and cut our two semi-circles.
GROUTING WALL TILES
When all the main tiles are in place you will have to allow the adhesive to dry. This will take about 24 hours. Using a grout spreader, push the grout into all the joints. Wipe any excess grout from the tile surface with a sponge and buff up with a soft cloth. Grouting alone is not suitable for providing a seal where it will get wet on a regular basis. For this, a silicone sealant should be applied.
Amber recommends products be installed by a professional tradesperson. These instructions are to be used only as guides. Amber does not accept responsibility for any incorrect installation results or improper preparation. For individual advice speak to your local Amber store.